Perfect Golf Grip - Hank Haney
Hank Haney
Former Tiger Woods Coach, Golf Digest Top 50 Instructor
Perfect Golf Grip - Hank Haney's Method
The grip is your only connection to the club. Get it wrong, and everything else becomes harder. Hank Haney, former coach of Tiger Woods, explains how to perfect your golf grip.
A proper grip makes it easier to square the clubface, generate power, and maintain control. Without it, you're fighting your equipment.
You'll learn:
- How to place your hands correctly
- Why grip position matters
- Common grip mistakes
- Practice drills
Let's get your grip right.
Why the Grip Matters
The grip is your only connection to the club. It affects:
- Clubface control
- Power generation
- Consistency
- Ball flight
Without a proper grip:
- Hard to square the clubface
- Lose power
- Inconsistent results
- Can't control ball flight
With a proper grip:
- Easy to square the clubface
- Generate power efficiently
- Consistent results
- Control ball flight
Key Takeaways from Hank Haney's Method
The key elements of a proper grip:
- Left hand position - Grip runs diagonally across palm
- Right hand position - Covers left thumb, "V" points right
- Pressure - Firm but not tight
- Connection - Hands work together, not independently
- Consistency - Same grip every time
Hank Haney
Former Tiger Woods Coach, Golf Digest Top 50 Instructor
Step-by-Step Breakdown
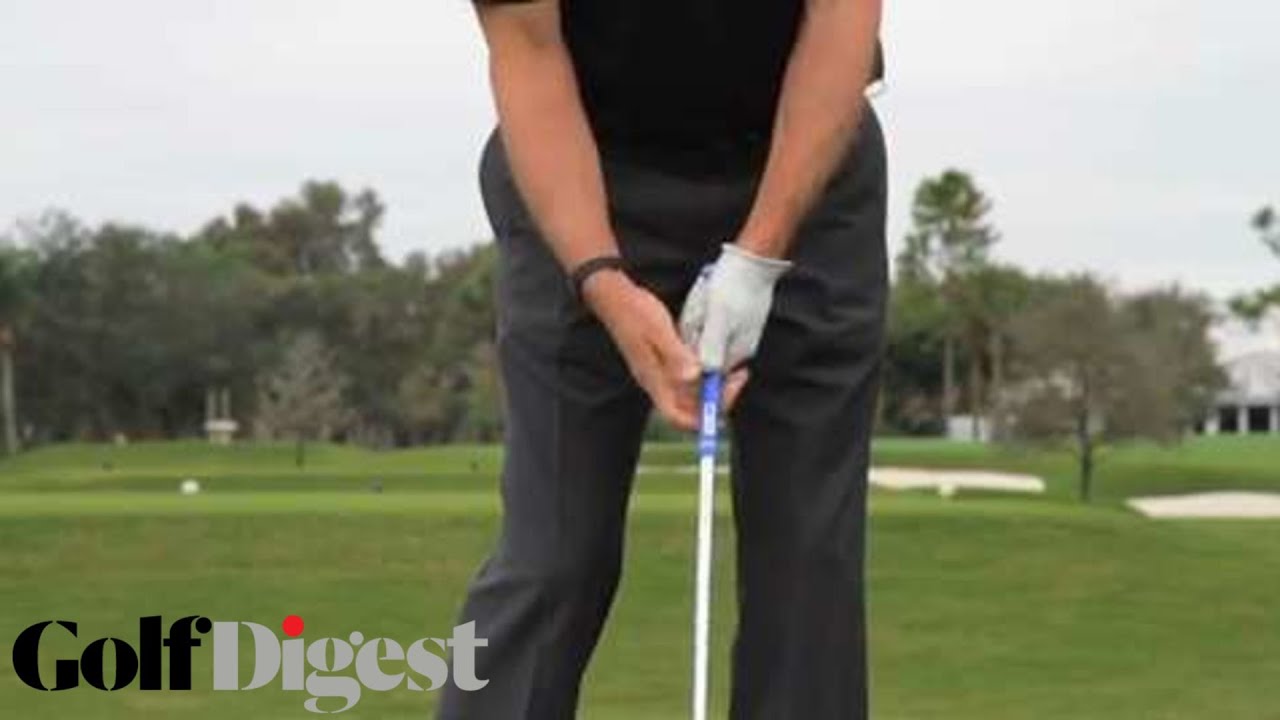
Step 1: Place Your Left Hand
What to do:
- Place the club in your left hand (for right-handed golfers)
- The grip should run diagonally across your palm
- From the base of your pinky to the middle joint of your index finger
- Your left thumb should sit slightly to the right of center
What it should feel like:
- The club should feel secure but not tight
- You should be able to rotate your forearm
- Your hand should feel connected to the club
What it should look like:
- From address, you should see 2-3 knuckles on your left hand
- Your thumb sits slightly to the right of center
- The grip runs diagonally across your palm
Step 2: Place Your Right Hand
What to do:
- Place your right hand so it covers your left thumb
- The "V" formed by your thumb and index finger should point toward your right shoulder
- Your right hand should feel connected to your left
- Both hands should work together
What it should feel like:
- Your hands should feel connected
- Not fighting each other
- Working together as one unit
What it should look like:
- Your right hand covers your left thumb
- The "V" points toward your right shoulder
- Both hands look connected and unified
Step 3: Check Your Grip Pressure
What to do:
- Hold the club firmly but not tightly
- Think of holding a bird—firm enough to hold it, not so tight you crush it
- Your grip should be consistent throughout the swing
- Don't grip tighter during the swing
What it should feel like:
- Firm but not tight
- Secure but not tense
- Comfortable and natural
What it should look like:
- Your hands look relaxed
- Not white-knuckled
- Comfortable and natural
Step 4: Verify Your Position
What to do:
- Check that you can see 2-3 knuckles on your left hand
- Check that the "V" points toward your right shoulder
- Check that your hands feel connected
- Check that your grip pressure is correct
What it should feel like:
- Your hands should feel connected and unified
- You should be able to rotate your forearms
- The club should feel secure but not tight
What it should look like:
- Your grip looks professional and correct
- Your hands are connected
- You look ready to make a good swing
Track Your Progress with ParPal
Apply what you've learned on the course. ParPal's AI caddie helps you identify when to use this technique and tracks how it impacts your game.
Start Tracking FreeDrills to Practice This Technique
Drill 1: Grip Check Drill
Equipment: Your 7-iron, mirror
How to do it:
- Take your grip in front of a mirror
- Check your left hand position
- Check your right hand position
- Check your grip pressure
- Make adjustments as needed
Reps: 10-15 grip checks
Success marker: Your grip looks correct. You can see 2-3 knuckles, and the "V" points right.
Drill 2: Pressure Drill
Equipment: Your 7-iron
How to do it:
- Take your grip
- Feel the pressure—firm but not tight
- Make slow swings focusing on maintaining pressure
- Don't grip tighter during the swing
Reps: 10-15 slow swings
Success marker: Your grip pressure stays consistent. You don't grip tighter during the swing.
Drill 3: Connection Drill
Equipment: Your 7-iron
How to do it:
- Take your grip
- Focus on your hands feeling connected
- Make swings feeling your hands work together
- Don't let your hands work independently
Reps: 10-15 swings
Success marker: Your hands feel connected. They work together as one unit.
Common Mistakes When Gripping
-
Too weak a grip - Seeing only 1 knuckle makes it hard to square the face. See 2-3 knuckles.
-
Too strong a grip - Seeing 4-5 knuckles makes it easy to close the face too much. See 2-3 knuckles.
-
Gripping too tight - Tension kills your swing. Grip firmly but not tightly.
-
Hands not connected - Your hands should work together, not independently.
-
Inconsistent grip - Grip the club the same way every time. Consistency is key.
Troubleshooting:
- Slicing? Your grip might be too weak. Strengthen it slightly.
- Hooking? Your grip might be too strong. Weaken it slightly.
- Inconsistent? Check your grip every time. Make it consistent.
Ready to Improve Your Game?
ParPal combines AI coaching with GPS shot tracking to help you make better decisions on every shot.
Download FreeFrequently Asked Questions
How tight should I grip the club?
Firm but not tight. Think of holding a bird—firm enough to hold it, not so tight you crush it.
How many knuckles should I see?
2-3 knuckles on your left hand. This is a neutral to slightly strong grip.
Should my hands be connected?
Yes. Your hands should work together as one unit, not independently.
How do I know if my grip is correct?
You should see 2-3 knuckles, the "V" should point right, and your hands should feel connected. You should be able to square the clubface easily.
Can I change my grip?
Yes, but do it gradually. Small changes are better than big ones. Practice the new grip before using it on the course.
Summary: Your Action Plan
Perfect golf grip is essential:
The Key Elements:
- Left hand: Grip runs diagonally, 2-3 knuckles visible
- Right hand: Covers left thumb, "V" points right
- Pressure: Firm but not tight
- Connection: Hands work together
- Consistency: Same grip every time
Your Practice Plan:
- Week 1: Focus on hand position. Use the grip check drill.
- Week 2: Work on grip pressure. Use the pressure drill.
- Week 3: Focus on connection. Use the connection drill.
- Week 4: Make it automatic. Check your grip before every shot.
Remember: The grip is your only connection to the club. Get it right, and everything else becomes easier.
Perfect grip doesn't happen overnight. Practice it regularly, and it will become automatic. You've got this.
Related Videos
Continue learning with these related golf instruction videos


Master the Fundamentals
Track your progress as you improve your grip. ParPal helps you master the fundamentals of golf.
Get Started